 Save to Pinterest
 I'll never forget the first time I created a peppermint stripe platter for my sister's holiday gathering. I was standing in my kitchen on a cold December afternoon, surrounded by vibrant red strawberries and creamy white cheeses, when the idea struck me—what if I arranged them like the candy canes from my childhood? Within minutes, I was layering rows of fresh mozzarella and raspberries, and when I stepped back to admire the work, the entire platter glowed like edible stripes of joy. My guests that evening couldn't believe it was so simple to create something that looked like it belonged on a magazine cover.
I made this platter for my daughter's school holiday party last year, and watching the kids' faces light up when they saw those perfectly alternating stripes of red and white was pure magic. One little girl whispered to her friend that it looked like a "fancy candy rainbow," and honestly, that's exactly what it is—wholesome indulgence that brings everyone together.
Ingredients
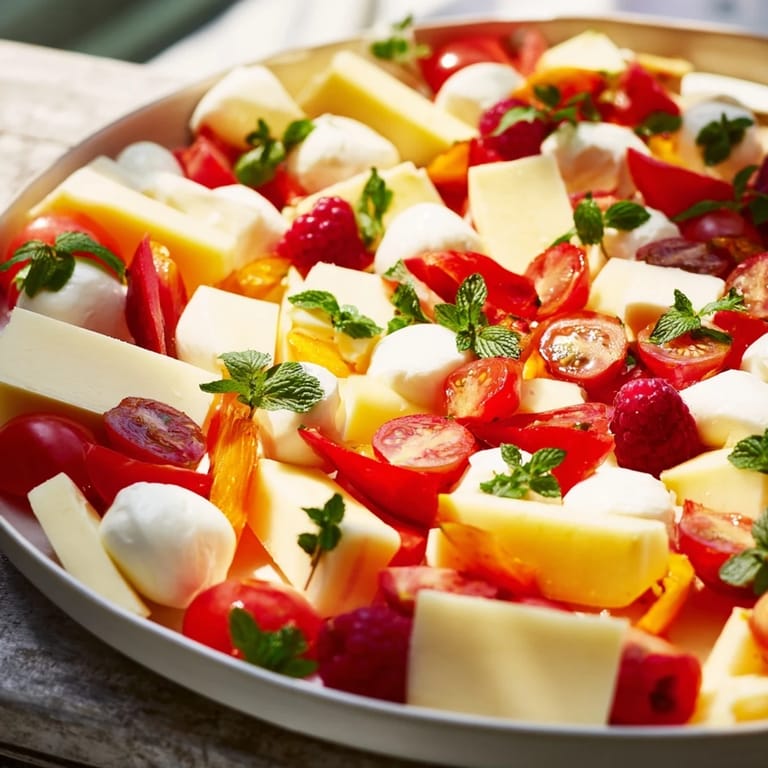
- Fresh mozzarella balls (200 g): These little pearls of creaminess are the backbone of your white stripes. I learned to pat them dry with paper towels before arranging—this keeps them from weeping liquid onto your other ingredients and maintains that pristine appearance.
- White cheddar cheese, sliced (200 g): Sharp enough to hold its own against the sweetness of the fruit, yet mild enough to appeal to everyone. Slice them about a quarter-inch thick so they catch the light beautifully.
- Havarti cheese, sliced (200 g): This buttery Danish cheese adds an unexpected sophistication to the platter. Its pale yellow hue still reads as white in the stripes, and it melts on your tongue in the best way.
- Sliced strawberries (150 g): Use the freshest, ripest berries you can find. The deeper the red, the more striking your stripes will be. I slice them about a quarter-inch thick and arrange them immediately to prevent browning.
- Raspberries (150 g): These jewel-toned beauties are delicate, so handle them gently. They add both color and a lovely texture variation to your red stripes.
- Cherry or grape tomatoes, halved (100 g): These bring a savory element that keeps the platter from feeling too dessert-like. They're also study little additions that won't wilt or collapse under the weight of arrangement.
- Roasted red bell peppers, sliced (100 g): I like to buy quality jarred ones to save time, but fresh roasted peppers have an incredible depth of flavor. They add glossy shine to your red rows.
- Thinly sliced salami (150 g, optional): This is where savory complexity enters the story. I discovered that rolling slami slices into little roses not only looks gorgeous but also makes them easier to grab.
- Prosciutto (100 g, optional): The paper-thin texture drapes beautifully between rows, adding an elegant, salty note for the carnivores at your party.
- Water crackers (150 g): Plain, neutral, and sturdy enough to support toppings without breaking. They fill the spaces between stripes and provide essential textural contrast.
- Baguette slices (100 g): Toast them lightly beforehand if you prefer—I learned this trick because raw bread can get soggy if the platter sits too long before serving.
- Fresh mint leaves: Essential for that peppermint candy illusion. Scatter them across the finished platter right before serving—they stay vibrant and aromatic this way.
- Microgreens or edible flowers (optional): These are my secret for that professional catering look. A few scattered on top instantly elevate the entire presentation.
Tired of Takeout? 🥡
Get 10 meals you can make faster than delivery arrives. Seriously.
One email. No spam. Unsubscribe anytime.
Instructions
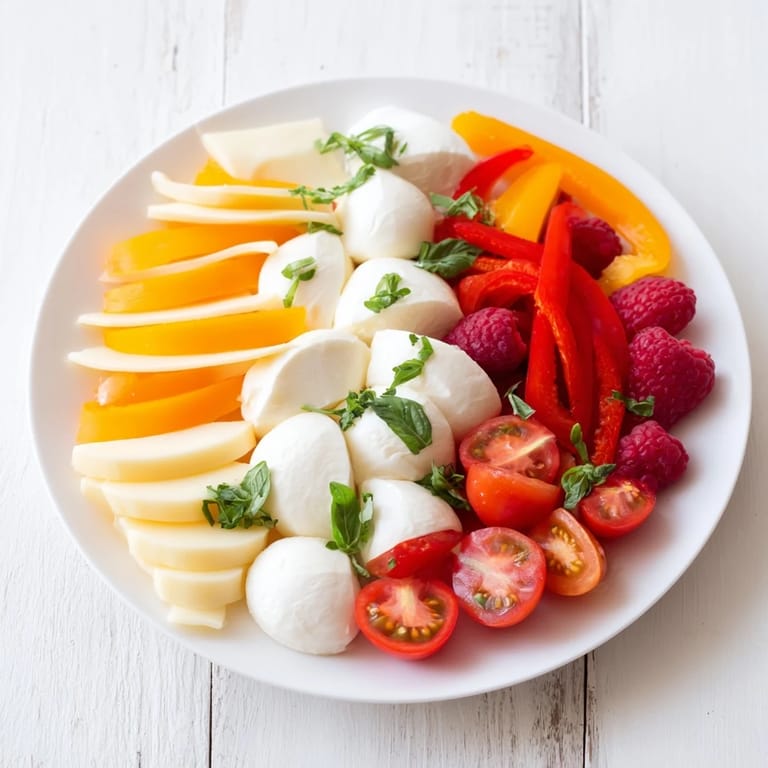
- Choose Your Canvas:
- Select a large platter—I prefer a rectangular wooden board because it makes the stripes look even more intentional, but a round platter works beautifully too. Make sure it's absolutely clean and dry before you begin. This is your stage, and every ingredient deserves space to shine.
- Lay Your First White Stripe:
- Start at one edge with your white cheese, arranging mozzarella balls or cheddar slices in a single, neat row. Space them so they're close but not overlapping. As you work, step back occasionally—you're creating a visual rhythm, and your eye will tell you if the spacing feels right.
- Add a Red Accent Row:
- Next to your white cheese, arrange your first red element. I like to start with fresh strawberries because their vibrant color makes an immediate impact. Arrange them with the cut side down so the juice stays in the fruit and doesn't dye your cheese.
- Build the Pattern:
- Continue alternating rows of white and red, using different ingredients as you go. Use white cheddar next, then raspberries, then mozzarella again, then tomato halves. This variation keeps the eye moving and prevents any monotony. You're essentially painting a edible landscape.
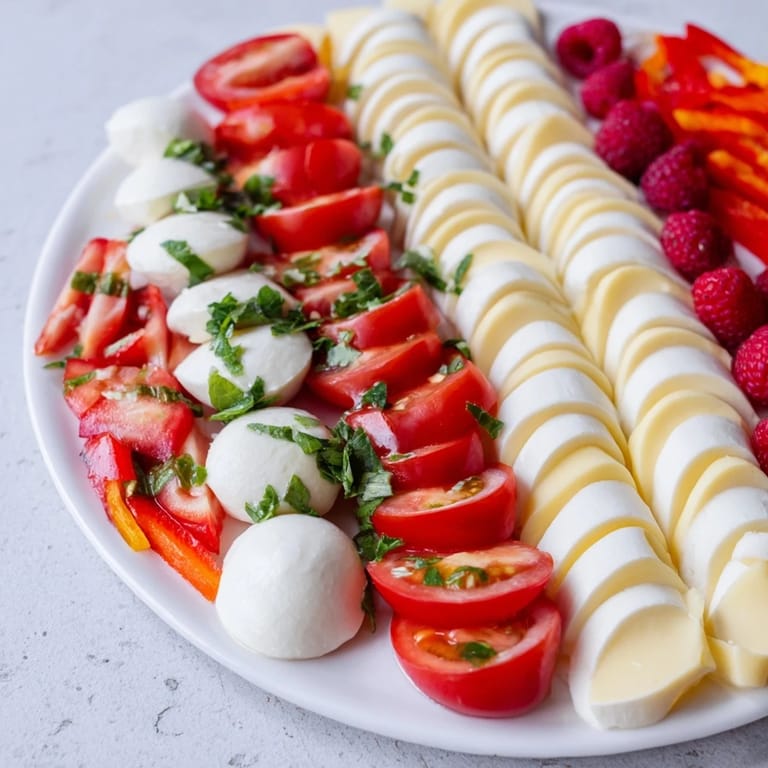
- Introduce Texture and Depth:
- Insert rows of crackers and baguette slices between some of your stripes. These neutral rows act like punctuation marks in your composition, breaking up the sweetness of the fruit and adding crunch. Lean the slices slightly so they catch the light.
- Create Salami Roses:
- If you're using salami, fold each slice loosely into a rose shape—roll it gently, tuck the edge under, and nestle it into your red stripes. It's a tiny act of kitchen theater that makes people smile. I learned to do this gently, without pressing, so the roses stay airy and beautiful.
- Finish with Garnish:
- Just before serving, scatter fresh mint leaves across the top of the platter. Their green color pops against the red and white, and their aroma whispers the peppermint promise. Add any microgreens or edible flowers here too—this is your final flourish.
- Serve or Hold:
- Serve immediately while everything is fresh and cool, or cover loosely with plastic wrap and refrigerate for up to 2 hours. I've learned that anything longer and the cheese starts to lose its texture, and the fruit begins to weep slightly.
 Save to Pinterest
 There's something deeply satisfying about creating something so beautiful that it becomes the centerpiece of a celebration. I remember watching my mother's face when she saw this platter for the first time at a family dinner—her eyes went wide, and she said, "Did you really make this?" as if I'd performed magic. That moment, when food transcends its purpose and becomes art that people genuinely treasure, is why I make this platter again and again.
The Art of Strategic Arrangement
Creating this platter taught me that cooking isn't just about flavor—it's about creating an experience for all the senses. When you arrange ingredients with intention, you're telling a story with color and form. I've learned that the most successful platters aren't necessarily the ones with the most ingredients, but the ones where every element has been thoughtfully positioned. The key is thinking in rows and layers, letting each ingredient have its moment while also contributing to the whole.
Customizing for Your Guests
One of my favorite things about this platter is how endlessly adaptable it is. For vegetarians, I simply double the cheese and add marinated tofu or roasted vegetables. For those watching their diet, I focus on the fresh fruit and lighter cheeses. I've even made a dessert version for a New Year's party using marshmallows, white chocolate, and red candies—the structure remains exactly the same, just the ingredients shift. The peppermint stripe formula is really a template for creativity, and once you understand the rhythm, you can fill it with whatever makes your guests happy.
Pairing and Presentation Magic
I discovered that what you serve alongside this platter matters almost as much as the platter itself. A light sparkling wine or cranberry spritz complements the festive colors and the mix of sweet and savory flavors. The refreshing acidity cuts through the richness of the cheese and makes everything taste brighter. For a non-alcoholic option, a pomegranate punch or sparkling cider water works beautifully. I always serve this platter with small plates and cocktail napkins nearby—you'd be surprised how many people feel intimidated about grabbing food from a beautiful display. Small props give them permission to indulge.
- Keep small cocktail forks or tongs nearby so guests feel confident taking what they want without disrupting your carefully arranged rows.
- Arrange the platter at eye level on a side table or raised surface—this prevents people from having to lean over and accidentally disturbing your design.
- Set out small plates and napkins nearby so guests can easily serve themselves without feeling like they're dismantling a work of art.
 Save to Pinterest
 This platter has become my answer to "What should I bring?" for nearly every holiday gathering. It's celebratory without being complicated, impressive without being pretentious, and genuinely delicious from every angle. Make it with joy, and it will carry that warmth straight to your guests' tables.
Recipe Questions & Answers
- → What cheeses are best for this platter?
Soft fresh mozzarella balls, white cheddar slices, and Havarti provide creamy and mild flavors that balance well with red fruits and vegetables.
- → Can I make this platter vegetarian?
Yes, omit meats and add extra cheeses, marinated tofu, or roasted red bell pepper hummus for added flavor and texture.
- → How should the platter be arranged?
Alternate rows of white cheeses with rows of red ingredients like strawberries, raspberries, and roasted peppers to create clear peppermint-style stripes.
- → What garnishes enhance the peppermint theme?
Fresh mint leaves and edible microgreens or flowers add a vibrant, fresh touch that evokes the peppermint spirit.
- → How long can the platter be prepared ahead?
Prepare and assemble up to 2 hours in advance, then cover and refrigerate to maintain freshness and presentation.
- → Are there suitable beverage pairings?
Light sparkling wine or a cranberry spritz complement the fresh and savory flavors beautifully.