 Save to Pinterest
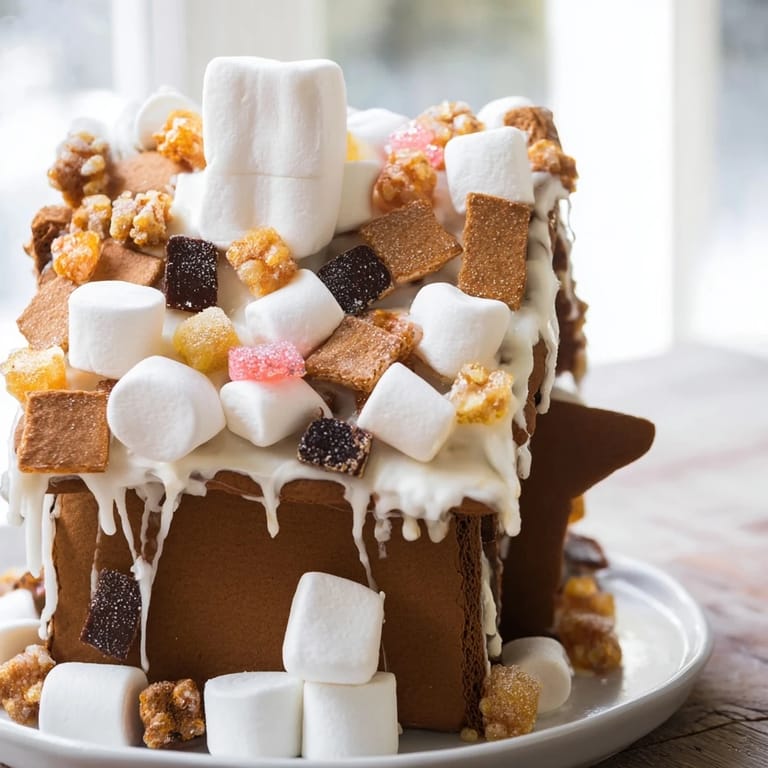
 I still remember the December afternoon my grandmother pulled out her worn gingerbread house template, the edges soft from decades of holiday use. She taught me that a gingerbread house isn't just about the final creation, but about the ritual of building it together, the kitchen filling with the warm scent of molasses and cinnamon while snow fell outside. Years later, I realized the magic wasn't in perfection, but in creating something edible and beautiful that could frame a table and spark joy. This gingerbread house frame became my way of honoring that tradition, transforming it into a sophisticated centerpiece that holds treats and memories all at once.
The first time I made this for my sister's holiday party, I was terrified the panels would crack or the whole thing would collapse like a sugar-dusted disappointment. Instead, as I piped the royal icing between the warm gingerbread pieces and felt them set firm, I realized I was doing more than decorating, I was building. When guests arrived and saw the frame nestled on the table, surrounded by festive cookies and treats, their faces told me everything. One person asked if it was from a bakery, and I felt that same pride my grandmother must have felt all those years ago.
Ingredients
- All-Purpose Flour (300 g): The foundation that holds everything together. Make sure it's fresh and properly measured by spooning and leveling, because too much flour makes the dough tight and the baked pieces brittle.
- Brown Sugar (100 g): This isn't just sweetness, it's what gives gingerbread its deep color and subtle molasses notes. Don't substitute with white sugar, it won't taste the same.
- Unsalted Butter (100 g), softened: The key word is softened, not melted. You want it to cream with the sugar into something light and fluffy, which incorporates air that makes the baked pieces tender rather than dense.
- Molasses or Dark Honey (100 g): This is the soul of gingerbread. Molasses gives you that dark, rich flavor that makes people close their eyes when they taste it. If you only have light molasses, use it, but dark is worth seeking out.
- Large Egg (1): This binds everything and adds moisture. Room temperature eggs mix in more smoothly, so if you remembered to take it out earlier, you're already winning.
- Ground Ginger (1 tsp): The spice that defines the whole experience. Fresh ground tastes brighter than the pre-ground, but either works. This is where the magic starts.
- Ground Cinnamon (1 tsp): Warmth in powder form. It's not just flavor, it's the smell of home during the holidays.
- Ground Cloves (½ tsp): Use this sparingly, it's powerful. It adds an old-fashioned complexity that makes people wonder what they're tasting.
- Baking Soda (½ tsp): This helps the dough rise slightly and gives you that tender crumb. Don't skip it thinking it won't matter, it will.
- Salt (¼ tsp): The secret ingredient that makes all the spices sing instead of just sitting there.
- Egg White (1): For the royal icing, and it must be at room temperature for proper volume when beaten.
- Powdered Sugar (200 g), sifted: Sifting matters here because lumps won't dissolve, they'll stay in your icing and show up as unwanted texture. Take the minute to sift it.
- Lemon Juice (½ tsp): A tiny brightness that prevents the icing from tasting too sweet and helps it set properly.
- White Chocolate (50 g), melted: This is your decorator's tool, creating beautiful drizzles and holding candies in place. Temper it gently over warm water if you want it to set with that beautiful sheen.
- Assorted Candies: Chocolate buttons, white sprinkles, mini marshmallows. Choose a color palette and commit to it, the restraint is what makes it look sophisticated instead of chaotic.
- Edible Glitter or Silver Pearls (optional): The final touch that catches the light and makes your creation shimmer like something from a fairy tale.
Tired of Takeout? 🥡
Get 10 meals you can make faster than delivery arrives. Seriously.
One email. No spam. Unsubscribe anytime.
Instructions
- Prepare Your Dough Base:
- In a large bowl, cream the softened butter and brown sugar together. You'll know it's ready when it looks light, fluffy, and pale, which takes about 2 to 3 minutes with an electric mixer. This is where you're incorporating air, so take your time and don't rush it. Add the egg and molasses next, mixing until everything is smooth and the color deepens to that rich brown you're after.
- Combine Your Spices:
- In a separate bowl, whisk together the flour, ginger, cinnamon, cloves, baking soda, and salt. This keeps the leavening agent distributed evenly and wakes up the spices so they blend beautifully throughout the dough. Breathing in while you whisk is half the pleasure.
- Bring It Together:
- Gradually add the dry mixture to the wet ingredients, mixing on low speed or by hand until a smooth dough forms. The dough should feel soft and workable, not sticky or stiff. Wrap it in plastic wrap and let it chill for at least 30 minutes, though overnight is even better because the flavors deepen and the dough becomes easier to work with.
- Heat and Prepare:
- Preheat your oven to 180°C (350°F) and line a baking sheet with parchment paper. This temperature is just right for gingerbread, hot enough to set the edges without overbaking the centers.
- Roll and Cut:
- On a lightly floured surface, roll the dough to about 5 mm thickness. Using your templates or a sharp knife, cut out the house panels, front, back, sides, and roof pieces. Aim for panels around 10 to 12 cm each. The precision here matters because panels need to fit together like a puzzle.
- Bake to Golden Firmness:
- Place the panels on the prepared baking sheet and bake for 10 to 12 minutes, until the edges feel just firm to the touch but the centers still have a tiny bit of give. You're not looking for snap-cracker texture, you want tender gingerbread. Let the pieces cool completely on a wire rack before touching them again.
- Create Your Royal Icing Glue:
- In a clean bowl, beat the egg white until soft peaks form, which takes about a minute. Gradually add the sifted powdered sugar, a bit at a time, beating constantly. This prevents lumps and ensures the icing reaches that thick, glossy, pipeable consistency. Add the lemon juice at the end. The icing should look like stiff peaks that hold their shape.
- Assemble Your Frame:
- This is the part that requires patience and a steady hand. Pipe or spread a line of royal icing along the edges of each panel and carefully press them together, holding briefly until the icing sets enough to hold. Work on a flat, clean surface and let each connection dry for a few minutes before adding the next piece. This isn't a race, it's a meditation.
- Decorate with Intention:
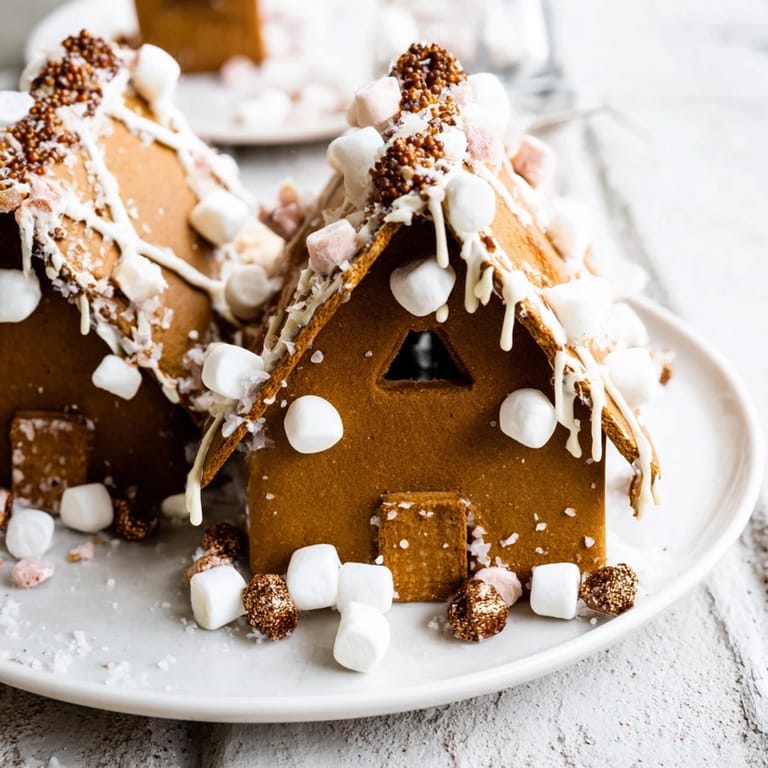
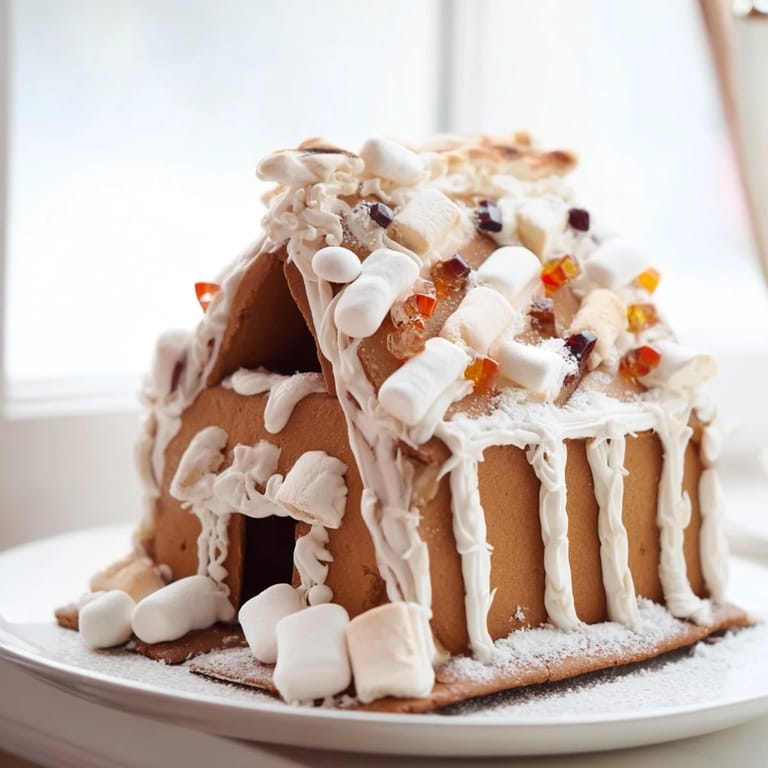
- Once the frame is fully dry and sturdy, use more royal icing to attach your candies, chocolate drizzles, and sprinkles. White chocolate drizzled through a piping bag creates elegant details. Place candies thoughtfully rather than randomly, creating a pattern that guides the eye around the frame. Dust with edible glitter if you're using it, doing this last so it catches and reflects light beautifully.
- Final Assembly:
- Once everything is completely set and the icing has hardened, transfer your gingerbread frame carefully to your serving platter. Arrange additional cookies, nuts, chocolates, and holiday treats around the interior and edges, creating a beautiful border of treats within and around the frame. Step back and admire what your hands created.
 Save to Pinterest
 I'll never forget when my nephew carefully selected which candies went where on the frame, treating each placement like it was going into a museum. He was five years old and completely serious about his architectural decisions. Watching his concentration, then his face light up when the whole frame was finally complete and he saw it on the table surrounded by all those treats, I understood why my grandmother had always made time for this. It wasn't about having a perfect decoration, it was about creating something together that said we cared enough to take the time.
The Magic of Planning Ahead
Here's a secret that changed my gingerbread house making forever, bake the panels a full day before you plan to assemble them. Store them in an airtight container and come back to the assembly fresh and calm. The panels are sturdier after sitting overnight, they're less prone to breaking, and you're not frantically baking and assembling on the same day. Plus, if you make the dough two days ahead and let it chill overnight, the flavor becomes even more complex. Building a gingerbread house is like building anticipation, and the time you give it pays back in texture and taste.
Personalizing Your Frame
The beauty of a gingerbread frame is that it's a blank canvas for your creativity and your favorite flavors. You can add cocoa powder to the dough for a deeper, more dramatic brown color that feels sophisticated. You can brush the cooled panels with edible gold or silver dust before assembling for a luxe feel. You can make the royal icing slightly less thick and use it for piping delicate details and borders. You can even infuse the dough with a touch of vanilla extract or a pinch of nutmeg if that speaks to your taste. The structure is your guide, but the soul is yours to create.
Serving and Storing Your Edible Centerpiece
Once your gingerbread frame is complete, it can sit on your table for several days if stored properly. Keep it away from direct heat and humidity because royal icing softens in warmth and moisture. Serve it with mulled wine or hot chocolate for a cozy pairing that feels intentional and special. The frame itself is edible, though by the end of your gathering the candies will have been picked off and the gingerbread panels can be broken apart and enjoyed, becoming part of the meal rather than just the decoration.
- If you need to store it longer than a few days, keep it in an airtight container in a cool, dry place for up to a week.
- The beautiful thing about this being entirely edible is that nothing gets wasted, everything can be enjoyed or saved for another occasion.
- If pieces crack or the frame becomes less structurally perfect over time, it only adds to the homemade charm and tells the story of the celebration it was part of.
 Save to Pinterest
 A gingerbread house frame is more than just a dessert or decoration, it's an invitation to slow down and create something with your hands and your heart. Whether you're making it alone as a quiet meditation or with people you love as a shared experience, you're doing something that people have done for generations in kitchens just like yours.
Recipe Questions & Answers
- → How do I ensure the house frame is sturdy?
Bake the gingerbread panels until just firm and allow the royal icing to dry fully before decorating to secure a stable structure.
- → Can I prepare the dough in advance?
Yes, chilling the dough before rolling and baking ensures better shape and flavor development. Panels can be baked a day ahead and stored airtight.
- → What spices enhance the dough's flavor?
Ground ginger, cinnamon, and cloves provide a classic warm spice profile that complements the dough beautifully.
- → Are there alternatives to royal icing for assembly?
Yes, vegan icing substitutes can be used if egg whites are a concern, though royal icing provides the best drying strength.
- → How can I decorate the frame attractively?
Use white chocolate drizzles, assorted candies, sprinkles, and edible glitter to create festive accents on the frame.
- → What tools are needed for shaping the panels?
Utilize a rolling pin, templates or a knife to cut panels, plus piping bags to apply royal icing during assembly.