 Save to Pinterest
 My neighbor knocked on my door one Tuesday holding a box of leftover tortillas and a pound of chicken. She had a dinner party planned but changed her mind about tacos, and somehow I ended up turning her castoffs into these wraps. The first bite stopped both of us mid-conversation. We stood in my kitchen, cheese dripping onto paper towels, realizing we'd stumbled onto something that belonged on a menu somewhere.
I made these for my brother's birthday instead of cake because he's never been a dessert person. He ate two in a row, then asked if I could teach his wife how to make them. She laughed and said she'd been cooking for him for nine years and he'd never requested a single recipe before. That's when I knew these wraps had some kind of magic to them.
Ingredients
- Boneless, skinless chicken breasts: Slicing them horizontally into thin cutlets is the secret to quick cooking and even crispiness, plus they fit perfectly in a tortilla.
- All-purpose flour: This first coating helps the egg stick, and I learned to press it in lightly rather than just dusting it on.
- Eggs: Beat them until the yolks and whites are fully blended so the coating goes on smooth and even.
- Italian-style breadcrumbs: The pre-seasoned kind saves time, but plain breadcrumbs work if you bump up the garlic and oregano a bit.
- Grated Parmesan cheese: Mixed into the breadcrumbs, it adds a salty, nutty layer that makes the crust taste more complex.
- Garlic powder: Fresh garlic burns too easily in hot oil, so the powdered version is actually better here.
- Dried oregano: It brings that classic Italian-American flavor without overpowering the marinara later.
- Salt and black pepper: Season every layer, including the breading, or the chicken will taste flat no matter how good the sauce is.
- Vegetable oil: You need enough to come halfway up the sides of the chicken for proper frying and that golden crust.
- Large flour tortillas: Burrito-size tortillas are essential because anything smaller will split when you try to fold them.
- Marinara sauce: I use a thick, chunky style so it doesn't make the tortilla soggy, and I always keep extra warm on the side for dipping.
- Shredded mozzarella cheese: It melts fast and pulls apart in those long, satisfying strings when you take a bite.
- Fresh basil leaves: Chopped basil adds a pop of color and a bright herbal note that cuts through the richness.
Tired of Takeout? 🥡
Get 10 meals you can make faster than delivery arrives. Seriously.
One email. No spam. Unsubscribe anytime.
Instructions
- Prep the Chicken:
- Slice each chicken breast horizontally so you end up with four thin cutlets that cook quickly and fit neatly inside a tortilla. Pat them dry with a paper towel so the breading sticks better.
- Set Up Your Breading Station:
- Put flour in one shallow dish, beaten eggs in another, and mix breadcrumbs, Parmesan, garlic powder, oregano, salt, and pepper in a third. Line them up in that order so you can move smoothly from one to the next without making a mess.
- Bread the Cutlets:
- Press each cutlet into the flour, shake off the excess, dip it in the egg until fully coated, then press it firmly into the breadcrumb mixture on both sides. The key is to really press the crumbs in so they don't fall off when frying.
- Fry the Chicken:
- Heat the oil in a large skillet over medium-high until it shimmers, then add the cutlets without crowding the pan. Fry for three to four minutes per side until deep golden brown and cooked through, then drain on paper towels.
- Clean the Skillet:
- Wipe out any burnt breadcrumb bits from the pan so they don't end up in your wraps later. A quick wipe with a paper towel does the job.
- Warm the Tortillas:
- Heat each tortilla in a dry pan or microwave for about fifteen seconds until soft and pliable. Cold tortillas crack when you try to roll them, which I learned the hard way.
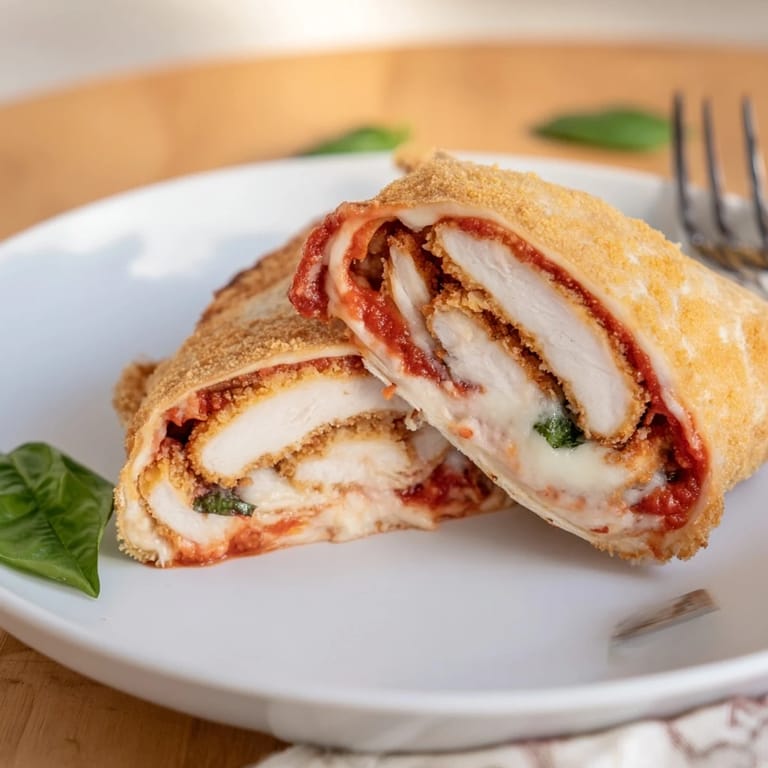
- Assemble the Wraps:
- Spoon about a quarter of the marinara sauce into the center of each tortilla, then place a crispy chicken cutlet on top. Sprinkle with mozzarella and a little chopped basil if you're using it.
- Roll Them Up:
- Fold in the sides of the tortilla first, then roll from the bottom up, pulling back slightly as you go to keep everything tight. A loose wrap falls apart when you pick it up.
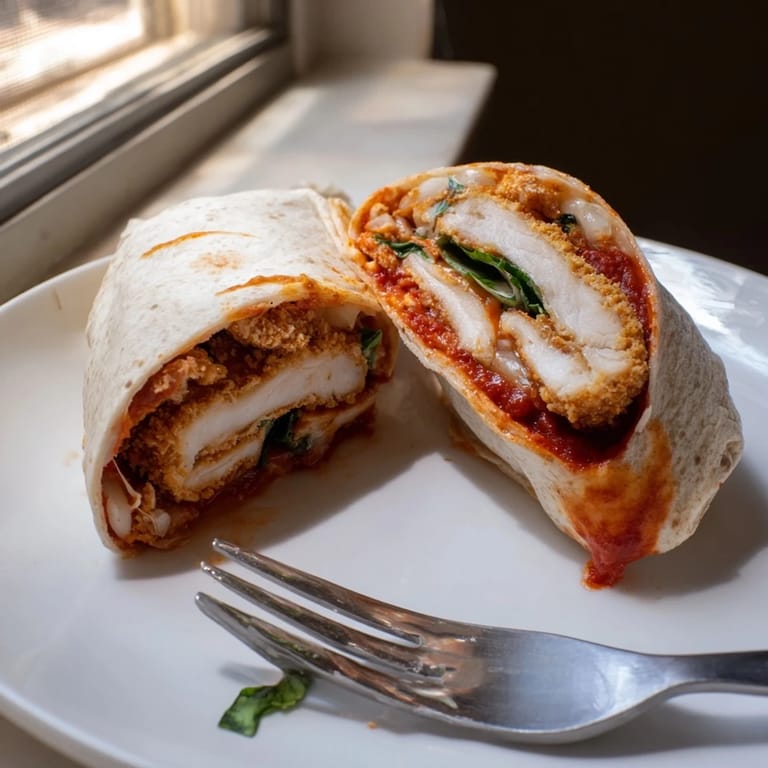
- Crisp the Wraps (Optional but Worth It):
- Place each wrap seam-side down in the skillet over medium heat and cook for two to three minutes per side until the tortilla is golden and the cheese inside is melted. This step makes them taste like they came from a restaurant.
- Serve:
- Cut each wrap in half on a diagonal and serve with extra marinara sauce on the side for dipping. They're best eaten warm, right after they come out of the pan.
 Save to Pinterest
 The first time I brought these to a potluck, someone asked if I'd ordered them from the new Italian place downtown. I didn't correct her right away because it felt good to know something I made in my regular kitchen could pass for restaurant food. When I finally admitted I'd made them myself, three people asked for the recipe before I even sat down.
Making It Your Own
I've made these wraps a dozen different ways depending on what's in the fridge. Swap the chicken for turkey cutlets if you want something a little leaner, or use plant-based cutlets if you're cooking for someone who doesn't eat meat. Sautéed spinach or roasted red peppers folded in with the cheese add color and a bit of sweetness that plays well with the marinara. One time I added a thin layer of ricotta under the chicken, and it turned the whole thing creamy and rich, almost like lasagna in wrap form.
What to Serve Alongside
These wraps are filling on their own, but a light Italian salad with lemon vinaigrette balances out the richness and adds some crunch. I've also served them with a side of garlic knots or a simple cucumber and tomato salad dressed with olive oil and red wine vinegar. If you're pouring wine, a chilled Pinot Grigio cuts through the cheese and fried breading without weighing you down. For a casual night, even a cold beer works perfectly.
Storage and Reheating
Leftover wraps keep in the fridge for up to two days if you wrap them tightly in foil. Reheating them in a skillet brings back some of the crispiness, though they won't be quite as crunchy as when they're fresh. I don't recommend microwaving them because the tortilla gets chewy and the breading goes soft. If you want to prep ahead, you can fry the chicken and store it separately, then assemble and crisp the wraps right before serving.
- Store fried chicken and tortillas separately if making ahead to keep the breading from getting soggy.
- Reheat wraps in a dry skillet over medium heat for the best texture.
- Extra marinara sauce keeps in the fridge for up to a week and tastes even better the next day.
 Save to Pinterest
 These wraps have become my go-to when I want something that feels indulgent but comes together faster than ordering delivery. Every time I make them, someone asks why I don't open a food truck, and honestly, I take that as the highest compliment.
Recipe Questions & Answers
- → Can I prepare the chicken ahead of time?
Yes, you can bread the chicken cutlets up to 4 hours ahead. Keep them refrigerated on a parchment-lined plate, then fry just before assembling the wraps for maximum crispiness.
- → What's the best way to keep tortillas from breaking?
Warm the tortillas in a dry skillet or microwave for 20-30 seconds until they're pliable. This prevents cracking when you fold and roll them around the fillings.
- → Can I use store-bought breaded chicken?
Yes, store-bought breaded or fried chicken cutlets work well. Simply warm them and assemble your wraps, reducing your preparation time significantly.
- → What are good substitutions for the chicken?
Turkey cutlets, plant-based cutlets, or even eggplant slices work beautifully. Cook them using the same breading and frying method for similar results.
- → Is the optional pan-searing step worth doing?
Yes, pan-searing the assembled wraps for 2-3 minutes per side creates a crispy exterior and ensures the cheese fully melts throughout. It adds wonderful texture and flavor.
- → Can I make these wraps vegetarian?
Absolutely. Substitute the chicken with thick slices of mozzarella, eggplant, or plant-based chicken alternatives. Use the same breading and frying technique for delicious vegetarian wraps.